Oh no! Chocolate has met your car seat! We've all been there – a rogue piece of candy, a melty ice cream cone, or a forgotten chocolate bar can leave a sticky, messy surprise on your car's interior. Don't panic! Removing chocolate from a car seat might seem daunting, but with the right tools and techniques, you can restore your car seat to its former glory. This guide will walk you through the process step-by-step, ensuring a chocolate-free ride every time. How to Remove Chocolate Stains from Car Seats : A Comprehensive Guide Getting chocolate out of your car seat involves a multi-pronged approach, addressing both the solid residue and the greasy stain it leaves behind. The sooner you tackle the stain, the easier it will be to remove. Remember to always test any cleaning solution on an inconspicuous area of the car seat first to ensure it doesn't damage or discolor the fabric. Step 1: Gather Your Supplies for Chocolate Removal Before you ...
Ever cranked up your car stereo only to be met with muddy bass, distorted vocals, or just… meh? Chances are, your car amplifier, the powerhouse driving your sound, isn't properly tuned. Tuning your car amp can feel daunting, but trust me, once you get the hang of it, you'll be amazed at the difference it makes. We’re going to break down the process step-by-step, so you can unlock the full potential of your car audio system and enjoy crystal-clear, powerful sound on every drive. So, buckle up, and let's get tuning!
Understanding the Importance of Tuning Your Car Amp
Tuning your car amplifier isn't just about making things louder; it's about achieving optimal audio quality and protecting your equipment. A properly tuned amplifier ensures your speakers receive the correct amount of power without distortion or damage. Incorrectly tuned amps can lead to several issues:
- Speaker Damage: Overpowering speakers can cause them to blow or distort, resulting in costly replacements.
- Poor Sound Quality: Distortion, clipping, and muddy bass ruin the listening experience.
- Amplifier Overheating: Improper settings can cause the amplifier to work harder than it should, leading to overheating and potential failure.
Think of your car audio system as a team. The head unit is the quarterback, calling the plays, the speakers are the receivers, catching the sound waves, and the amplifier is the offensive line, providing the power and protection. If the offensive line (your amp) isn't doing its job correctly, the whole team suffers. Correctly tuning your car amplifier allows you to fine-tune how much power your speakers are getting, ensuring that everything works in harmony. It will also allow you to ensure that the amp and speakers are working at their highest level.
Consider a case study: A local car audio enthusiast recently complained about his new subwoofer sounding "muddy" and lacking punch. After investigating, it turned out his amplifier's gain was set far too high, causing clipping and distortion. After carefully tuning the amp with an oscilloscope and a multimeter, the subwoofer suddenly came alive, delivering clean, powerful bass. This illustrates how even high-end equipment can underperform without proper tuning.
Essential Tools and Equipment for Tuning Your Car Amp
Before you dive into adjusting knobs and switches, gather the necessary tools and equipment. Having the right tools will make the process smoother, more accurate, and safer for your equipment.
- Multimeter: Used to measure voltage and impedance, crucial for setting gain levels accurately. A multimeter is a must-have for any serious car audio enthusiast. They typically cost from $20-$100 dollars.
- Oscilloscope (Optional but Recommended): Provides a visual representation of the audio signal, allowing you to identify clipping and distortion. While not essential, an oscilloscope offers the most precise way to tune your amplifier. An oscilloscope typically costs from $50 - $200 dollars.
- Test Tones: Sine wave tracks at specific frequencies (e.g., 50Hz for subwoofers, 1k Hz for mids and highs) used to set gain and crossover points. You can easily find and download these tones online.
- Screwdrivers: Various sizes to adjust the amplifier's controls.
- Headphones: To critically listen for distortion and subtle changes in sound.
- Owner's Manuals: For your amplifier, speakers, and head unit. These contain crucial specifications and recommendations.
Why are these tools important? A multimeter allows for precise voltage measurements, which is critical for setting the amplifier's gain. An oscilloscope provides a visual representation of the audio signal, making it easier to identify clipping. Test tones provide a consistent signal for accurate tuning, and the owner's manuals provide valuable information specific to your equipment. Using these tools ensures that you are setting your amplifier to optimal performance, prolonging equipment life and maximizing sound quality.
Step-by-Step Guide on How To Tune A Car Amp
Now, let's get down to the nitty-gritty of tuning your car amplifier. Follow these steps carefully for optimal results. This is a general guideline, so please refer to your amplifier and speaker documentation for the correct settings.
Step 1: Setting the Gain
Gain is arguably the most misunderstood control on an amplifier. It's not a volume knob. The gain control matches the input signal voltage from your head unit to the amplifier's input sensitivity. Setting the gain too high can cause clipping and distortion, while setting it too low can result in a weak signal.
- Prepare Your System: Turn off the car, but keep the head unit on. Set the volume to approximately 75% of its maximum. This is a common recommendation because most head units will start to distort at higher volume levels.
- Disconnect Speakers (Recommended): Disconnecting the speakers helps protect them in case of any mishaps during the tuning process. This is especially important if you're unsure about your settings.
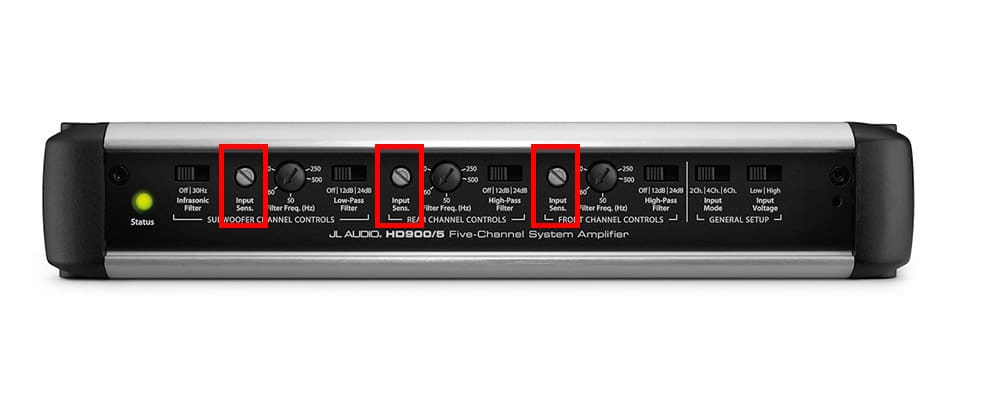
- Locate the Gain Control: Find the gain knob on your amplifier. It's usually labeled "Gain," "Input Level," or Sensitivity.
- Set the Gain to Minimum: Turn the gain knob all the way down (counter-clockwise).
- Measure Head Unit Output Voltage (with Multimeter): Using your multimeter, measure the AC voltage output from your head unit's RCA outputs. Refer to your head unit's manual for the pinout. This reading will be used to calculate the target voltage for your amplifier's output. If your head unit has a clipping indicator (light), increase the volume until the light comes on, and then back off just below that level.
- Calculate Target Output Voltage: Use Ohm's Law (Voltage = Square Root of (Power x Impedance)). For example, if you have a 500W amplifier connected to a 4-ohm subwoofer, the target voltage would be √(500W x 4Ω) = √2000 = 44.7 volts.
- Play a Test Tone: Play a sine wave test tone at the appropriate frequency for your speakers. Use 50Hz for subwoofers, 1k Hz for midrange speakers, and a higher frequency for tweeters.
- Increase the Gain Gradually: Slowly increase the gain knob while monitoring the amplifier's output voltage with your multimeter (connected to the speaker terminals). Stop increasing the gain when the voltage reaches your calculated target voltage.
- Fine-Tune by Ear: Reconnect your speakers and listen carefully for any distortion. If you hear distortion, even at lower volumes, slightly reduce the gain until the sound is clean.
Step 2: Adjusting the Crossover
Crossovers direct specific frequencies to the appropriate speakers. This ensures that your subwoofers handle the low frequencies, your midrange speakers handle the mid frequencies, and your tweeters handle the high frequencies. Using crossovers improves sound quality and prevents speakers from trying to reproduce frequencies they aren't designed for.
- High-Pass Filter (HPF): Allows high frequencies to pass through while blocking low frequencies. Typically used for midrange speakers and tweeters.
- Low-Pass Filter (LPF): Allows low frequencies to pass through while blocking high frequencies. Typically used for subwoofers.
- Band-Pass Filter (BPF): Allows a specific range of frequencies to pass through while blocking frequencies above and below that range. Can be created by using both an HPF and an LPF together on a single speaker.
- Determine Crossover Frequencies: Consult your speaker specifications to determine the recommended crossover frequencies. A common starting point is 80Hz for the LPF on a subwoofer and 80Hz for the HPF on midrange speakers. You may want to refer to your speaker documentation or contact the manufacturer for suggested frequencies.
- Locate the Crossover Controls: Find the crossover knobs or switches on your amplifier. They're usually labeled "HPF," "LPF," or "Crossover Frequency."
- Set the Crossover Points: Adjust the crossover knobs to the desired frequencies. If your amplifier has a crossover switch, make sure it's set to the appropriate mode (HPF, LPF, or Full Range).
- Fine-Tune by Ear: Listen to the sound and make small adjustments to the crossover frequencies until you achieve a smooth transition between the different speakers. Pay attention to the blending of the bass, midrange, and high frequencies.
Example Crossover Settings:
| Speaker Type | Filter Type | Recommended Frequency |
|---|---|---|
| Subwoofer | LPF | 80Hz |
| Midrange | HPF | 80Hz - 120Hz |
| Tweeter | HPF | 3k Hz - 5k Hz |
Step 3: Adjusting Bass Boost (Use Sparingly)
Bass boost is designed to increase the amplitude of a narrow range of low frequencies. While it can add more thump to your bass, excessive bass boost can lead to distortion, clipping, and speaker damage. Use it sparingly and only if needed. Many experienced car audio installers recommend against using bass boost altogether.
- Locate the Bass Boost Control: Find the bass boost knob or switch on your amplifier. It's usually labeled "Bass Boost."
- Start at Minimum: Set the bass boost to its minimum setting (usually 0d B).
- Increase Gradually (If Needed): If you feel the bass is lacking, increase the bass boost slightly. Listen carefully for any distortion. If you hear distortion, reduce the bass boost immediately.
Important Considerations: Bass boost can put a significant strain on your amplifier and speakers. If you're running a high-powered system, it's best to avoid bass boost altogether. Instead, focus on proper gain and crossover settings to achieve clean, powerful bass. Also, note that using a bass knob is preferable to using the bass boost function on the amplifier. This allows for greater control over the output. If you find the bass is lacking, try adjusting your EQ settings in the head unit. Often, this is a much better method of improving overall sound quality.
Step 4: Setting Subsonic Filter (For Subwoofers)
A subsonic filter (also known as a high-pass filter for subwoofers) blocks extremely low frequencies (typically below 20Hz) that are inaudible but can still cause excessive cone movement and damage to your subwoofer. These ultra-low frequencies are often generated by the car's environment or by poorly produced music. Setting a subsonic filter improves subwoofer performance and extends its lifespan.
- Locate the Subsonic Filter Control: Find the subsonic filter knob or switch on your amplifier. It's usually labeled "Subsonic Filter" or "High-Pass Filter (Subwoofer)."
- Determine the Appropriate Frequency: The ideal subsonic filter frequency depends on your subwoofer's specifications and the type of enclosure it's in. A general recommendation is to set the subsonic filter a few hertz below the enclosure's tuning frequency. For a sealed enclosure, a setting of 20-30 Hz is typical. For a ported enclosure, find the enclosure's tuning frequency (often provided by the manufacturer) and set the subsonic filter slightly below that.
- Set the Subsonic Filter: Adjust the subsonic filter knob or switch to the desired frequency.
Tips and Tricks for Perfect Car Amp Tuning
Tuning your car amp is a skill that improves with practice. Here are some additional tips and tricks to help you achieve the best possible sound:
- Use High-Quality Test Tones: Ensure your test tones are clean, accurate, and free of distortion. Download them from a reputable source.
- Listen Critically: Pay attention to the subtle nuances in the sound. Listen for distortion, clipping, and imbalances in the frequency response.
- Make Small Adjustments: Don't make drastic changes to the settings. Small, incremental adjustments are easier to fine-tune and less likely to cause damage.
- Double-Check Your Wiring: Ensure all connections are secure and properly wired. Loose or incorrect wiring can cause signal loss, distortion, and even damage to your equipment.
- Take Breaks: Listening for extended periods can fatigue your ears. Take breaks to avoid making incorrect judgments.
- Consult a Professional: If you're unsure about any aspect of the tuning process, consider consulting a professional car audio installer. They have the experience and equipment to accurately tune your system and ensure optimal performance.
In conclusion, tuning your car amplifier is a crucial step in achieving optimal audio quality and protecting your equipment. By following these steps and using the right tools, you can unlock the full potential of your car audio system and enjoy crystal-clear, powerful sound on every drive. Remember to take your time, listen critically, and make small adjustments until you achieve the desired results. Happy tuning!