Oh no! Chocolate has met your car seat! We've all been there – a rogue piece of candy, a melty ice cream cone, or a forgotten chocolate bar can leave a sticky, messy surprise on your car's interior. Don't panic! Removing chocolate from a car seat might seem daunting, but with the right tools and techniques, you can restore your car seat to its former glory. This guide will walk you through the process step-by-step, ensuring a chocolate-free ride every time. How to Remove Chocolate Stains from Car Seats : A Comprehensive Guide Getting chocolate out of your car seat involves a multi-pronged approach, addressing both the solid residue and the greasy stain it leaves behind. The sooner you tackle the stain, the easier it will be to remove. Remember to always test any cleaning solution on an inconspicuous area of the car seat first to ensure it doesn't damage or discolor the fabric. Step 1: Gather Your Supplies for Chocolate Removal Before you ...
So, you're staring at those bubbled, peeling window tints on your car and thinking, "Ugh, how did it come to this?" We've all been there. Maybe the tint is old and faded, or perhaps you need to remove window tint to comply with local laws. Whatever the reason, taking off that old window tint can seem daunting, but trust me, with a little patience and the right techniques, you can do it yourself and save some serious cash. This guide will walk you through several methods for removing window tint from your car windows like a pro.
How To Remove Window Tint From Your Car Like a Pro
Removing old car window tint can be a tricky process if you don't know what you are doing. Window tint removal is a cost-effective do-it-yourself project if you follow the proper methods and use the proper materials. In this guide, we'll explore different methods for safely and effectively removing window tint without damaging your windows. We'll cover everything from the supplies you need to step-by-step instructions to make the process as smooth as possible.
Understanding the Challenges of Window Tint Removal
Before we dive into the methods, it's important to understand the challenges involved in removing window tint from your car. The most common issue is adhesive residue left behind after peeling off the film. This residue can be incredibly sticky and difficult to remove, requiring extra effort and specialized cleaning solutions. Also, improper techniques can lead to scratches or damage to your car's windows, so it's important to be gentle and careful throughout the process.
- Adhesive Residue: This is the most common and frustrating problem.
- Window Damage: Using sharp objects or abrasive cleaners can scratch or damage the glass.
- Heat Sensitivity: Some rear windows have defroster grids that can be damaged by excessive heat or scraping.
- Patience Required: Rushing the process can lead to incomplete removal and more headaches.
Supplies You'll Need To Remove Tinting Film
Gathering your supplies beforehand will make the removal process much smoother. Here’s a list of items you’ll likely need depending on the method you choose:
- Heat Gun or Hair Dryer
- Spray Bottle
- Ammonia-Based Cleaner or Soap Solution
- Large Trash Bags or Plastic Wrap
- Razor Blade or Plastic Scraper (Use with Caution!)
- Microfiber Towels
- Glass Cleaner
- Rubbing Alcohol (for stubborn residue)
- Gloves
Make sure you have all these supplies ready and accessible before you start the tint removal process.
Methods for Removing Window Tint From Car Windows
There are several methods you can use to remove window tint, each with its own pros and cons. Let's explore some of the most effective techniques:
The Heat Gun Method for Easy Tint Removal
The heat gun method is one of the most popular and effective ways to remove window tint. The heat helps to loosen the adhesive, making it easier to peel off the film.Be careful to not overheat the glass, as this could cause it to crack or shatter.
- Prepare the Window: Clean the window surface with glass cleaner and dry it thoroughly.
- Apply Heat: Using a heat gun or hair dryer, evenly heat a small section of the window tint. Keep the heat gun moving to avoid overheating any one spot.
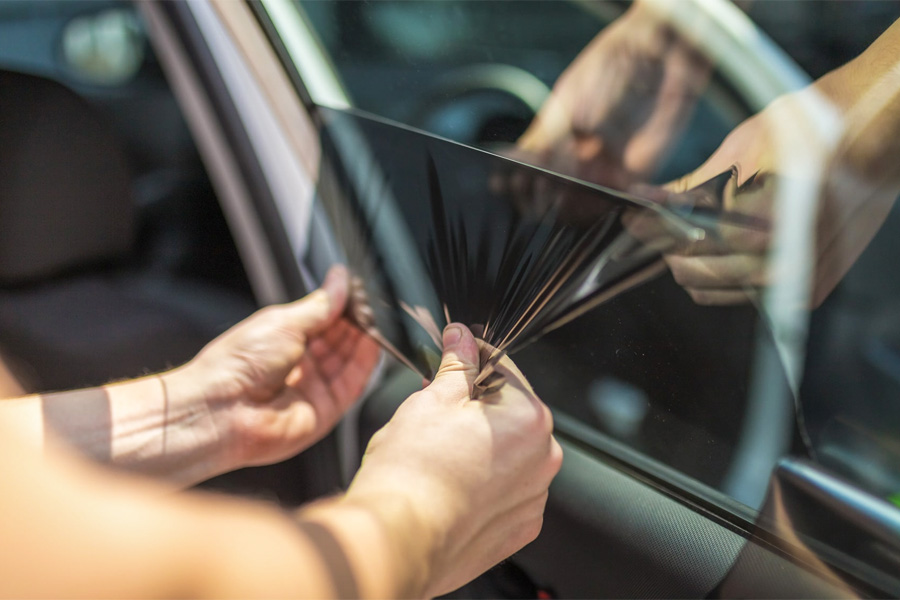
- Peel the Tint: Once the tint is warm, use your fingers (wearing gloves) or a razor blade to gently peel the tint away from the glass. Pull the tint slowly and steadily, keeping it close to the glass.
- Repeat: Continue heating and peeling the tint in sections until the entire window is clear.
- Remove Residue: After removing the tint, use a razor blade or scraper to carefully remove any remaining adhesive. Clean the window with glass cleaner and rubbing alcohol to remove any leftover residue.
Tips for Using the Heat Gun Method:
- Safety First: Always wear gloves and eye protection when using a heat gun.
- Even Heat: Apply heat evenly to avoid damaging the glass or defroster grids.
- Steady Pull: Pull the tint slowly and steadily to minimize adhesive residue.
The Soap and Sun Method for Removing Window Tint
This is a slower, but often more gentle method. The sun's heat combined with soapy water helps to loosen the adhesive over time. Here's how to do it:
- Apply Soapy Water: Mix a few drops of dish soap with water in a spray bottle. Liberally spray the soapy water onto the inside of the window tint.
- Cover with Plastic: Cut a large trash bag or plastic wrap to fit the window. Spray the plastic with soapy water and apply it to the inside of the window, pressing out any air bubbles.
- Let it Bake: Park the car in direct sunlight for several hours, allowing the heat to soften the adhesive.
- Peel and Remove: After the tint has been baking in the sun, try peeling it away from the glass. It should come off more easily than before.
- Remove Residue: Use a razor blade or scraper to remove any remaining adhesive. Clean the window with glass cleaner and rubbing alcohol.
Tips for Using the Soap and Sun Method:
- Optimal Weather: This method works best on hot, sunny days.
- Patience is Key: The longer you let the tint bake, the easier it will be to remove.
- Reapply Soapy Water: If the plastic starts to dry out, reapply the soapy water to keep the tint moist.
The Ammonia Method for Removing Window Tint
Ammonia is a powerful solvent that can effectively dissolve the adhesive on window tint. However, it's important to use ammonia safely and with proper ventilation, as it can be harmful if inhaled. This method is often considered one of the most effective for tough tint jobs. Keep in mind that ammonia has a very strong odor and proper ventilation is mandatory.
- Prepare the Window: Clean the window surface and cover any nearby surfaces with plastic to protect them from ammonia.
- Apply Ammonia: In a well-ventilated area, spray the inside of the window tint with an ammonia-based cleaner.
- Cover with Plastic: Cover the tint with plastic wrap or a trash bag, pressing out any air bubbles.
- Let it Sit: Allow the ammonia to sit on the tint for at least an hour, or preferably longer. The longer it sits, the easier the tint will be to remove.
- Peel and Remove: After the ammonia has soaked into the tint, peel it away from the glass.
- Remove Residue: Use a razor blade or scraper to remove any remaining adhesive. Clean the window with glass cleaner and rubbing alcohol.
Tips for Using the Ammonia Method:
- Ventilation: Always work in a well-ventilated area to avoid inhaling ammonia fumes.
- Protective Gear: Wear gloves and eye protection to protect yourself from ammonia.
- Avoid on Defrosters: Be very careful when using ammonia on rear windows with defroster grids, as it can damage them.
Using a Steamer for Window Tint Removal
A steamer is a safe and effective way to loosen window tint adhesive without using harsh chemicals. The steam gently softens the adhesive, making it easier to peel off the film. This method is often preferred for its environmental friendliness and safety.
- Prepare the Window: Clean the window surface to remove any dirt or debris.
- Apply Steam: Using a handheld steamer, apply steam evenly to a small section of the window tint.
- Peel the Tint: As the tint is being steamed, use your fingers (wearing gloves) or a plastic scraper to gently peel it away from the glass.
- Repeat: Continue steaming and peeling the tint in sections until the entire window is clear.
- Remove Residue: After removing the tint, use a scraper to carefully remove any remaining adhesive. Clean the window with glass cleaner and rubbing alcohol.
Tips for Using a Steamer:
- Consistent Steam: Ensure the steamer provides a consistent flow of steam for best results.
- Gentle Peeling: Peel the tint slowly and steadily to avoid tearing it.
- Protect Defrosters: Be extra careful around rear window defroster grids.
Removing Stubborn Adhesive Residue
No matter which method you choose, you'll likely encounter some stubborn adhesive residue. Here are some effective ways to remove it:
- Rubbing Alcohol: Soak a microfiber towel with rubbing alcohol and scrub the residue. Let it sit for a few minutes to soften the adhesive before wiping it away.
- Goo Gone: Apply Goo Gone or a similar adhesive remover to the residue and let it sit for the recommended time. Then, wipe it away with a clean cloth.
- Razor Blade: Use a razor blade to carefully scrape off the residue. Be sure to hold the blade at a shallow angle to avoid scratching the glass.
- Vinegar: Spray vinegar onto the residue and let it sit for a few minutes before wiping it away. Vinegar is a natural and gentle cleaner.
Always test any cleaning solution in an inconspicuous area first to ensure it doesn't damage the glass or surrounding surfaces.
Preventing Damage During Tint Removal
Preventing damage to your car's windows and defroster grids is crucial during the tint removal process. Here are some tips to help you avoid costly mistakes:
- Use Caution with Heat: Avoid overheating the glass, as this can cause it to crack or shatter.
- Be Gentle with Scrapers: Use plastic scrapers instead of metal razor blades whenever possible, and always hold the blade at a shallow angle.
- Protect Defrosters: Be extra careful when removing tint from rear windows with defroster grids. Avoid using excessive heat or harsh chemicals in these areas.
- Avoid Abrasive Cleaners: Do not use abrasive cleaners or scrub brushes, as they can scratch the glass.
DIY vs. Professional Window Tint Removal
While removing window tint yourself can save you money, it's important to consider whether it's the right choice for you. Here's a comparison of DIY vs. professional window tint removal:
| Factor | DIY Window Tint Removal | Professional Window Tint Removal |
|---|---|---|
| Cost | Lower (cost of supplies) | Higher (labor and materials) |
| Time | More time-consuming | Faster |
| Skill Level | Requires patience and attention to detail | Requires specialized skills and equipment |
| Risk of Damage | Higher risk of damage to windows or defroster grids | Lower risk of damage |
| Convenience | Requires you to do the work yourself | More convenient (someone else does the work) |
If you're comfortable with DIY projects and have the time and patience, removing window tint yourself can be a rewarding experience. However, if you're concerned about damaging your windows or prefer to leave it to the professionals, hiring a professional tint removal service is a better option.
Legal Considerations for Car Window Tint
Before you remove your car window tint, it's important to be aware of any legal considerations in your area. Many states have laws regarding the darkness and reflectivity of window tint. Make sure your car complies with these laws to avoid fines or other penalties.
If your car's window tint is illegal, you may be required to remove it to pass a vehicle inspection. Check your local laws and regulations to ensure you are in compliance.
Conclusion: Mastering How To Remove Tint From Car Window
Removing car window tint can be a bit of a chore, but with the right tools, techniques, and a healthy dose of patience, you can achieve professional-looking results. Whether you choose the heat gun method, the soap and sun method, or the ammonia method, remember to prioritize safety and take your time. Good luck, and enjoy your newly clear windows!